Tag: Programming

  • #ghc15: Natasha Murashev – The Zen Guide to WatchOS

    #ghc15: Natasha Murashev – The Zen Guide to WatchOS

    My friend @NatashaTheRobot gave an awesome talk at GHC about WatchOS. I find a lot of tech talks focus on the how, not the why, but she completely inverted it – tying the technical details to the kind of experience you want to create. I’ve been pretty meh on watches (and glasses) because I want fewer notifications in my life not more! But her talk and philosophy on this made me think that maybe – if every developer was so considerate and mindful of their user-experience – a watch might not be a bad thing, at all…

    NatashaTheRobot and the Tiny Raccoon
    NatashaTheRobot and the Tiny Raccoon

    Tao Te Ching – Chinese philosophy book, way of life. Very zen and very nice, like to read it as part of meditation.

    “We join spokes together in a wheel,
    but it is the center hole
    that makes the wagon move.

    We shape clay into a pot,
    but it is the emptiness inside
    that holds whatever we want.

    We hammer wood for a house,
    but it is the inner space
    that makes it livable.

    We work with being
    but non-being is what we use.”

    ~Tao Te Ching, Chapter 11

    How does this relate to the watch? The watch is one of those devices, it’s a physical device, but it’s about not using it. Want people to use our apps, but think about what kind of world do you want to live in? Want to live in the moment. People miss out on things because they’re always on this phone.

    Watch is about freeing you from that mentality. Does this through 3 things:

    1. Notifications – on your wrist, you can really feel it. Free you up to move around the world, have zen feeling – if something comes up, you will know about it.
    2. Glances / cards. Can go through multiple apps and get the most important pieces of data. 
    3. App. Only use it from glance or notification. Watch is very action oriented. Go to the app for more information, would never think “I’m gonna go read the NYT on my watch”.

    New watch OS, new interactions – complications. Making glances even less important.

    Creating the watch experience is about asking “what’s the one most important piece of information the user needs?” Give it to them, and then they can move on with their day.

    “The personal nature of Apple Watch requires a different approach when it comes to designing Watch app, glance, and notification interfaces. Your interfaces need to display information quickly and facilitate fast navigation and interactions. Creating that kind of interface means you should not simply port your existing iOS app behavior over to Apple Watch. Instead, create a complementary experience to your iOS app.”

    ~Apple Watch Programming Guide

    Don’t be the heart rate app – screen dies before shows heart rate. Should be instant. No endless spinners.

    Biggest development, architectural thing, make sure the data is right there. Not going to be visible, pretty. People aren’t going to notice it because it’s just going to work.

    Watch connectivity – framework for passing data between iOS app and watch app and vice versa. Watch isn’t really standalone. Can do API requests, but most work should be done on iOS device and then passed to the watch.

    Watch connectivity has two big parts.

    • Background data. Want to transfer data in the background, by the time the user raises their hand it’s too late. Think about transferring data as the app runs in the background. Apple controls when info gets passed. You don’t have the control of when, but pretty much guaranteed when they raise their wrist it’ll be fast.
      • Application context: e.g. game score 5 minutes ago doesn’t matter, what matters is score now. Queue of one piece of data. New data replaces old data. At time of transfer, only the latest data is sent across.
      • User info transfer. Data over time. e.g. conversation app. Need to make sure every piece of data is moved over, use user info. WatchOS and iOS are different platforms, can’t pass objects. Like plist data types, dictionaries. Have to serialise and create an object on the other end.
      • File transfer: images. Can send over metadata, e.g. picture ordering, can organise by date.
    • Interactive messaging: you need to transfer data right away. E.g. flappy bird on the watch, hit the watch to make the bird flap on the iPhone.
      • Immediate information transfer.
      • Requires reachable state (have unlocked recently, there is a chance this could fail).

    Coding

    WCSession – singleton. WC – watch connectivity. That’s how you transfer data.

    Not hard. But have to make sure it’s supported. Universal apps; iPad will not support the apple watch. 

    Because WCsession is a singleton, wrap in another you have more control over. Might have to do some data processing, but you want to check because you don’t want to do data processing if you don’t need to. Have a “startSession” function, can call it in applicationDidFinishLaunchingWithOptions.

    A valid session means the app is installed, and paired. Don’t want to be doing data processing for the user that doesn’t have a valid session.

    Overall API is pretty simple. Sender, receiver. Use WC to send the data.

    Resources

    I’m at GHC this year because Capital One is hosting me as a blogger! Come by and find me at the booth to say hi if you’re here!

  • A Brief Rant about TDD

    A Brief Rant about TDD

    success ln / failure dr
    Credit: Flickr / StockMonkeys.com

    I’ve been giving this talk about unit testing UI code lately and of course when you talk about testing, TDD (test driven development) keeps coming up.

    The question ranges from “have you embraced TDD as the One True Way Of Testing, and if not why not because you’re doing it wrong” and “I have heard that TDD is the One True Way Of Testing, but I don’t unit test at all and I’m overwhelmed”.

    Note that neither of these are actually questions, but I digress.

    When it comes to my own workflow, I don’t do strict TDD (gasp!)

    • I don’t debug; I write tests.
    • When I have something that is inputs in -> outputs out I quite often write my tests first. In practise very little application code is like this.
    • Testing is largely an architectural problem, and I architect my code such that it is testable, usually writing my tests concurrently.
      • I don’t consider my code to be “done” until it is tested.
      • A lot of my testing involves testing UI code, e.g. I test that the right thing happens when a button is tapped. I guess technically I could stub out the view element and write tests for it, in practise I tend to complete my train of thought and write the view and then test it.

    Here’s my answer to the second none-question: I don’t believe in telling people to TDD. I believe in testing your code. That’s it. I’m happy to share my workflow, and techniques I use (buy my workshop!) but people should do what works for them.

    I do think though that TDD is something that you work up to (some point of), not what you start with. Because:

    • When you start writing tests you’ll probably find more bugs in your test code than your actual code. This kind of undermines the idea of the tests as the spec.
    • It’s super intimidating. You’re almost certainly going to discover that however you have been writing your code it’s not in a way that is testable. You’re going to need to refine your tests and your code together.
    • The idea that something has to be done “The Right Way” rather than “At All” is a huge impediment to starting. If you want to write more tests don’t wait until you have a new class that you can do TDD on, set aside an hour, choose something simple and get going.

    TL;DR: I don’t really TDD. I don’t care if you TDD. I do think everyone should test their code, though.

  • Over-Engineering Culture, Hacking, and Complexity

    Over-Engineering Culture, Hacking, and Complexity

    Bora Ultra Two Dark Cult (6)
    Credit: Flickr / Glory Cycles

    I was talking to a fellow escapee of The Conglomerate and we were talking about over-engineering culture. In the sense of “lol things built because it was time for someone to get promoted” and in the sense of complexity.

    The thing about layers and layers of (debatably necessary) abstractions is that they make things that should be simple, complex. Which makes people feel stupid. The last change I committed there I was adding one field… and I had to change > 15 files. The biggest problem I had? Was thinking I must be doing something wrong because it couldn’t possibly be this hard to add one field, right?

    I think of hacking as fixing one corner case only to make two more for later. So, reflecting on this, this is also true of a culture where things are hacked together. Because when hacks build on each other again and again, the result is that simple things become harder (and slower) than they should be. It makes people feel stupid.

    We often talk about these two cultures like they are completely separate but this is not true. They feed on each other.

    • Hacking can be a result of over-engineering culture, because things that can’t be done “correctly” may as well not be done properly at all.
    • Hacking can be a reaction to an over-engineering culture, because people tired of things being so hard want to move fast and break things.
    • Over-engineering can be a reaction to hacking because someone bitten by too many corner cases decided that it would be better if everything were a perfect circle.
    • Over-engineering can be a reaction to hacking because perfectionism can be a reaction to things constantly breaking.

    Personally, I like to think about the medium term. Essentially this means: don’t hack things because hacks are short-term. But just because there might be a reason why something won’t expand to fulfil some other purpose doesn’t mean that it should be generalised (yet). If that scenario is uncertain, and not in the current timeframe, document and move on.

    Hacking to over-engineering isn’t a scale, it’s a circle. At the darkest part where they meet, simple things are hard, and engineers trying to get to grips with it feel stupid. Thinking about it, I’m not sure whether that codebase that required fifteen files to be changed to add one field was over-engineered or made of hacks, but does it matter? The effects were the same. Move slowly, with things that barely work.

  • Refactoring and Legacy Code

    Refactoring and Legacy Code

    Credit: Wikipedia
    Credit: Wikipedia

    The first iOS project I worked on was a big mess that shipped without unit tests. It was a project that had had a number of different directions taken from a product perspective… and the code was like an archeological record of them.

    Since then I’ve worked on various things, most of which have been greenfield projects. It’s much more fun – and far easier – to make your own bad decisions than to deal with someone else’s.

    Earlier this year I came full circle and started working once again on a real legacy code base. Inherited from another dev it didn’t compile, had limited documentation and… no unit tests.

    So I set about trying to move forward on this. I’ve picked up various things about refactoring over the years and in theory I knew but now I’ve come to really understand that moving a mass of spaghetti code towards a properly architected system is a completely different problem than building a properly architected system.

    It was important to keep moving, and moreover keep moving sustainably. There was no point in having an impressive two weeks and then grinding to a halt. Technical debt is an unhedged call option. This one was coming due.

    The first things I did were:

    Contain and Continue: When I find something that’s functional-ish, I wrap it in something else, give it a sensible API, and continue. It probably needs to be replaced, but not yet, and this way the replacement will be easier.

    Clarify Control Flow: This was probably the biggest piece of work with the fewest visible changes, and the largest impact. When a complex thing is badly architected, it’s really hard to tell what happens when, what talks to what, etc. It took a while to get to the point where this was possible but basically: calling the old code is done explicitly. Luckily on iOS there’s a pretty simple and clear way to get to this point: removing the old AppDelegate. Moving to a “thin” app delegate got rid 0f most of the random behaviour.

    These things were pretty effective and I had a strategy for using old code but what about when I needed to get back from the old code to the new code? Explicitly having “this is a dependency we need to remove” and calling out was OK. If we started to add dependencies from the old code to the new code I worried that it would not contain things, and would make things harder to fix later.

    The solution I hit on is an old one: notifications (in fact I remember notifications being used extensively in that first, terrible, app). I define some notifications in a file imported by both old code and new code. Old code posts the notification. New code listens for it. One day (which can’t come soon enough) I’ll remove the listener and something else will invoke the same code.

    I’m not a fan of notifications-based programming in general, because I think it obfuscates the control flow and makes testing harder. Things fire notifications. Any number of things respond to them. Who knows what happens when and how do you begin to write tests for what the outcome of any notification might be? (Typical answers: no-one, and you don’t).

    There have been a couple of files in this code base where deleting them is the goal. Not one that will be achieved overnight, but bit by bit chipped away at maybe with the odd gleeful day of what one of my (non-programmer) friends calls “code murder”. Now this file of notification names is one of them.

    It’s a list of constants. Of compromises. The sooner it’s deleted, the happier I’ll be. But for now: it works. Things are getting better. I keep chipping away.

  • Giving a Talk and a Workshop – in Two Days

    Giving a Talk and a Workshop – in Two Days

    Unit Testing on iOS

    Submitting

    I have two ways of submitting to CfPs. The first: a carefully written abstract of a talk that I have already prepped, and probably already given.

    The second: something that I have already been exploring in blog posts, collected into a “here is this thing that I think I could talk about, but I’m not 100% sure what that would look like yet”.

    My submission to mdevcon at the start of the year was of the second variety, prompted by the inclusion of the CfP in an edition of Technically Speaking. It was based on a series of blogposts about unit testing UI code on iOS which had been relatively well read. It included the comment that “this could be either a workshop or a talk”.

    Typically I follow a policy of submit and forget – there’s no point getting too attached to these things, you have no control once you’ve submitted, after all.

    And then one day an email arrives. And it said – “how about both?”

    My reaction: Yay! I was accepted! Both! Ai! Could I? OK then.

    Preparing

    So I had committed myself to giving my first super technical talk, and my first workshop together, on the same topic, in a two day period. Luckily I had around 6 weeks to prepare.

    My initial design constraint was the title: Unit Testing on iOS: Beyond the Model. Clearly there was going to be some overlap between the two, but I didn’t want to just present the same content in two lengths – I think a workshop should be designed differently from a talk. A talk is to give you something to think about, to take back into your own work. A workshop is a deep dive into learning something, I want people to come away feeling like they have conquered it.

    I decided to make my talk about what I actually do, not what we might do in a contrived example. Because this, to me, is the main benefit of conference talks – learning what people actually do.

    So I opted to tie the talk to my own app, Show and Hide. It’s a relatively simple app UX-wise, the engineering challenges are in the image processing. So I build the talk along the screens, introducing two testing techniques per screen. I showcased my KIF tests by running them – live – using this time to introduce what the app actually does. And I opened and closed with stories about why testing is important and what the ROI is. I used my speaker notes (I write very detailed notes that are easy to turn into a blog post) to get feedback on what people found particularly interesting and what they struggled with.

    With the talk mostly done, I moved onto preparing the workshop.

    For the workshop, I built a simple sample app of a tic-tac-toe game with a full suite of tests. As part of getting feedback on the content from my talk, I had discovered that people’s knowledge when it came to testing on iOS was widely divergent. Some people were interested because they wanted to know how to unit test UI code… others were hoping to learn how to start unit testing… at all.

    This was a huge constraint on the design of the workshop. I added a section in at the beginning covering how to unit test, period. Spent more time on how mocks work. I’ve never been a fan of instructor does something, pauses while everyone has a go, and because experience levels vary so widely, people are either bored or rushed. But knowing that my audience would vary between: no knowledge of unit testing at all, to experts in testing just not of unit testing UI code completely ruled this out as an option. I was not going to start my workshop dismissing half the audience, or boring the rest.

    As a result, I put together a ~20 page document that worked through testing the sample app, step by step. With a section at the beginning that could be skipped (unit testing basics) and a more open ended section at the end which I expected only experienced people to get to (getting started with UIAutomation using KIF). I created a fork of the sample project, and deleted tests from it, leaving behind examples and comments on where to insert code. I actually covered more testing techniques in the talk than the workshop – because a deep dive takes a lot longer than an overview.

    My workshop was also the first to sell out! Which was exciting but put the pressure on. Thankfully the organisers found me a TA to help.

    Final step was a practise talk, where I got some helpful feedback which I incorporated into both the talk, and where applicable the workshop.

    Delivering

    Delivering the workshop and the talk was intense and exhausting.

    The workshop came first. I gave people access to the document, and then moved around the room on rotation, being sure to spend time with everyone. You hear a lot more issues people are facing if you go to them and ask, and there are a lot more opportunities to elaborate and connect with them. Because I had hosted the code on GitHub, and the instructions on GoogleDocs, I was able to make minor changes as people ran into things (thankfully there weren’t many).

    Once it was over I was exhausted! I went for food and a walk, unable to contemplate speaking to another human for a while.

    Bizarrely when it came to it I was more nervous about the talk than the workshop. The workshop was so thoroughly prepared that I felt like I had ran out of nervous energy doing that much preparation. And I couldn’t think past it being over! So once it was, I felt like I was under-prepared for my talk. Actually I had done about as much preparation as I normally do, I just hadn’t had the emotional capacity to be as anxious about it!

    After

    When I got the feedback from the workshop, the main comment was that I hadn’t run it in a more typical way – with explanations and breaks for people to try things out. My initial reaction was “but it was designed that way for a reason!” and then I realised – this is a sign of success. If people think that was an option, they must have left feeling their level of expertise – whatever it was (and having spent time with everyone I can tell you it was incredibly varied) – was entirely normal. Really, I would sooner people leave a workshop I ran thinking I’d made a mistake in how I designed it, than feeling stupid because they didn’t know some key concept.

    If you are interested in the content, you can find my blog post from my speaker notes here, and an updated version of the workshop for working through at home is available for sale.

  • Some Thoughts on Mocking

    Some Thoughts on Mocking


    Magritte Pipe
    Credit: Wikipedia


    When do we use mocks and when shouldn’t we? Some thoughts:

    Don’t Mock Data Structures

    We wouldn’t mock an NSArray or an NSDictionary, so why would we mock our own data structures? Data structures should be simple and well tested, so we can trust them to behave as they should. It will be more work to mock them than just to use them.

    Mock Behaviour, Not State

    If we did decide to mock a data structure, we’d have to specify all the interactions between the mock and the code. That would make our tests more verbose.

    More importantly, the relevant thing isn’t how the data structure is used (the behaviour), but what happens given the state.

    Combining This

    We use mocks when we have a complex object that we want to control. For example, we’d use a mock for things where we can’t set the state. So for instance, we might want a mock to return a fake location or return that the device has a camera (even though the simulator doesn’t have a camera). If we used a mock to return a fake location, we would return a real location object (which we can create with whatever data we want), but through a mock.


    If you found this interesting, I’ve covered testing iOS apps in more detail in this workshop – there’s a sample app and a guide that takes you step by step through adding tests.

  • Discoveries About OSS Culture

    Discoveries About OSS Culture

    Danbo on Flickr II
    Credit: Flickr / Andrés Nieto Porras

    I was hanging out with an OSS-dude (OSS = Open Source Software) for a while, and I learned a couple of things.

    Firstly – don’t try and buy committed OSS types books. It’s a complete nightmare.

    Secondly – I’ve reached a better understanding of harassment and open source. And particularly the pushback, which comes from a place of “we all put up with this”. It’s not that OSS people think this behaviour is acceptable (although no doubt there are exceptions), it’s that they don’t know how to change it.

    Death threats are a common occurrence; he gets them regularly, even if they are rarely talked about publicly, and there are no public meetups around a project he works on in a city because there is a guy who is sufficiently threatening.

    The threats and harassment are – seemingly – trying to assert dominance. The way that men assert dominance over other men is different from the way they assert dominance over women, and the difference in threats reflects that.

    There’s an attitude from some of “I put up with this, so why not you?” and the short answer is no-one should put up with it. Willingness to tolerate threats and harassment is a high bar for a career, let alone a hobby (but 50% of OSS work is actually done as part of someone’s job).

    But as I observe to him, the worst case is it’s a 6-foot dude, how worried is he? He laughs and says, “well I am a 6 foot dude”.

    As someone who is not a 6-foot dude, for me the worst case scenario is pretty terrifying.

    As in all cases where the argument “but [person / culture] is vile for everyone” it’s worth considering:

    • Do some groups have reason to feel more threatened?
    • Is this behaviour historically gendered or racial (even if you are claiming it isn’t this time)
    • Is it possible that people feel more comfortable exhibiting this behaviour to already marginalised people? (Less likely to experience repercussions, because marginalised people tend to have less power).

    In any discussion on Open Source, it’s worth linking to Ashe Dryden’s excellent essay The Ethics of Unpaid Labor and the OSS Community.

  • Unit Testing on iOS: Beyond the Model

    Unit Testing on iOS: Beyond the Model

    Unit Testing on iOS

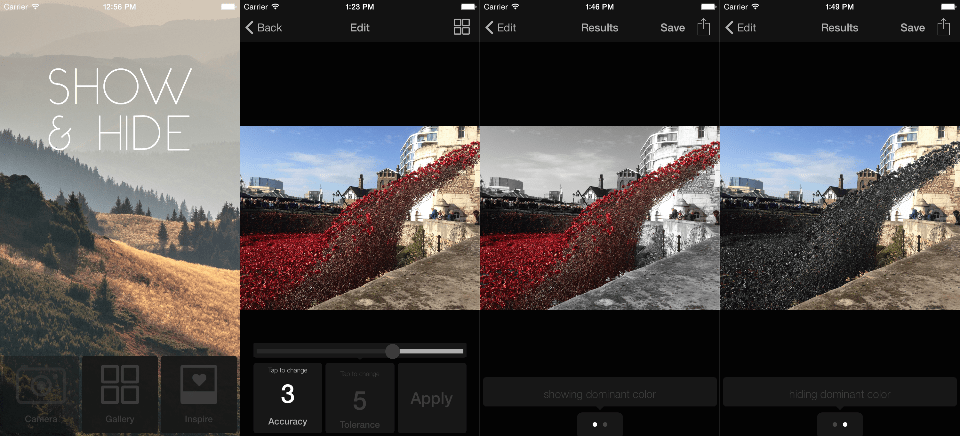
    I want to introduce you to my app, it’s called Show and Hide. It’s an image processing app. This is V1, so the UI is pretty simple, so I think it’s a reasonable example.

    Briefly, what the app does is it detects the dominant color in an image, and creates these cool partially colored images based on that. Think of the postcards of London with the black and white scene and the red bus. Except it’s done algorithmically so the idea is you don’t actually need… you know… artistic talent.

    I have a workshop, built around an example app but I here I’m talking about a real one. Because one of the things I find really useful is finding out what people really do, not what we might theoretically do in a constraint-free world, or where we can bend our spec to match what we are trying to demonstrate. This is what I really do.

    Admittedly, I’m a bit of a unit testing obsessive… as you will see.

    3 Principles

    I want to start with some things that I think are true. If you find these assumptions wildly disagreeable it might be a good sign you’ll hate this post.

    There is no One True Way of Writing Software

    The first is that there is no One True Way of writing software. I really don’t have a lot of, well any, patience for arguments like “which is better Vim or Emacs?”. At a higher level than that, I think we work within the constraints we have, and we make the decisions that make sense to us at the time. Maybe the last developer wasn’t an idiot! Maybe they were just working with different information than we have today, or under different constraints.

    You Are Not Your Code

    The second is that you are not your code. We use that as a reason not to get attached to our code, to be OK if it gets deleted. I think it also works the other way – we all write stupid code sometimes, it doesn’t mean that we are stupid.

    Any Test is Better Than No Test

    The final thing is that any test is better than no test. This might be the most contentious. I’ve been on code reviews where someone critiques a test because it’s not done some “better” way, which incidentally would require a significant refactoring. I take the approach, write a test. Even a bad test, because at least you will have a test. Then you can improve it, and your code. This is mostly about avoiding analysis paralysis – instead of agonizing over perfection, I advocate for writing some kind of test, and going from there.

    3 Apps

    Who actually writes unit tests for their iOS apps? Anyone shipped an app without any?

    Guess what kind of coverage the first iOS app I worked on had? I’ll give you a clue. I used to work for Google.

    OK, that was more of a red herring. It had zero test coverage. We shipped without tests.

    At the time, I was a junior developer, but I knew this was wrong. And I asked the guy running the project, the tech lead, if this wasn’t a problem? Shouldn’t we like… have unit tests?

    And he said, “we’re moving too fast to write tests.”

    His answer was not compelling to me, but I wasn’t really in a position to argue.

    Then, in the way of all badly executed projects in remote offices, this project was taken to the US. And I moved to work on something else.

    This new app did have tests. Some tests. Not many. We talked about “designing for testability” and “dependency injection” and all this kind of stuff… but we didn’t actually write that many tests.

    And again, in the fullness of time, this project was also taken to the US. So I moved to Australia, and now I was the tech lead, I had two engineers, a clear mandate, a 3-month deadline, and it was great.

    Have you noticed how often in this industry we learn what not to do? It doesn’t always teach us that much about what we should do. Anyway, I had learned that it was a Bad Idea to ship an app without unit tests. So we had a test target. We also had this deadline that was pretty tight.

    We were about 2 months into the project. I had finally started to believe that yes, we might actually be able to send the app to the app store in another month.

    My manager calls me into a meeting and tells me his manager isn’t happy with our test coverage. My mind is blown. I mean, I had worked on an app without any tests at all and nobody seemed to worry about that. And we’re doing pretty well for an iOS app, I thought. We have a test target, our model code is tested, we’re about to add some UI-automation tests. What more does he expect?

    Background

    I’ll finish that story later, for now let’s start looking at how we can do better than that.

    Just a bit of background, that I want everyone to be happy with. These are some testing concepts that occur throughout and it’s important you are happy with them. I’ll mention what libraries I use, and alternatives.

    What is a Mock?

    Firstly mocks. Mocks are objects we create in tests that we can use to simulate the behavior of a real object. We can give set responses for events, and record all interactions with the mock.

    There are “nice” mocks, and “strict” mocks. Nice mocks are – you guessed it – nicer. Strict mocks have to have every interaction defined otherwise they will cause the test to fail.

    There are a number of mocking frameworks available. I’m using OCMock but you could also look at OCMockito.

    It’s worth mentioning here when we use mocks and why. So we can use mocks to verify interactions – to say, this event triggers this interaction, and we can use them to create state.

    For example, an image app, includes the option to take pictures. But, only on the device, as the simulator doesn’t have a camera. So we need some way to create the “state” of having a camera, and the way we do that is by using a mock.

    This is why we don’t mock data structures. You use an NSArray instead of a mock NSArray because a mock NSArray is a bad idea. Mocking the state of the array is so much harder than just… using a real array.

    If you think about inductive proofs, if you’ve ever done that kind of thing, it’s just math really, there are some things that you accept as true. Like, 1 + 1 is 2. And if we think of tests as verification of what our program does, there are some things we accept as working, and data structures are that.

    Tests that verify interaction are more tightly coupled to the inner workings of your code. Sometimes this is what you expect, it’s just something to be aware of.

    UIAutomation Testing

    UIAutomation tests are also known as monkey tests – something that will go through and tap buttons on your app and make things happen. These are properly “black box” tests – all they know about is the UI, not the inner workings of your code.

    Personally, I use KIF which wraps Apple’s UIAutomation so we can write tests in Objective-C, but there are other alternatives.

    Confidence vs Coverage

    The other thing that it is worth mentioning here is measuring coverage. I use CoverStory, there are other options like Frankencover or XCover.

    Code coverage tells us what percentage of our code is covered, and we can use it to identify areas with poor coverage so we can improve them.

    Coverage just means the lines have been executed. It doesn’t mean that they have executed properly. You can write one enormous test that exercises every line of code in your app, but it might not tell you much more than “it compiles”.

    Confidence is about knowing how things work, having different inputs covered. Confidence allows me to develop against my tests.

    Creating a Seam

    The Trouble with View Controllers

    The big reason why iOS is not that testable is that the ViewController mixes control code and view code. If we want to write tests, we don’t really want these two things entwined together – we want a “seam” between them – a seam is what we use to isolate something and test it.

    Introducing the Presenter

    The name presenter comes from the “MVP” or “Model – View – Presenter” pattern, but it doesn’t really matter, the point is we split out the “control” code from the ViewController, and leave the ViewController only handling the view. So what might we split out?

    • Delegates.
    • Selectors put on targets (like buttons).
    • Network calls.
    • Interfacing with the model.

    So each ViewController now has a corresponding Presenter. Because of memory management, the Presenter needs to keep a weak reference to the ViewController and the ViewController a strong reference to the Presenter. A top level class allows us to abstract away code common to all such pairings.

    Things in the top level class:

    • A call to [presenter viewLoaded] in [viewController viewDidLoad
    • [viewController pushNavigationController].

    The best possible level of separation in this model is:

    • The ViewController knows there is a Presenter.
    • The MyScreenViewController knows there is a Presenter.
    • The MyScreenPresenter knows it is related to a MyScreenViewController.

    This is similar to the Reactive Cocoa MVVM pattern, but you don’t have to go full Reactive Cocoa in order to make it work. There’s little enough code here that I will happily recreate it in each project, so each time only what I need are included [more detail here].

    Testing Show & Hide

    Now that we’ve covered these concepts, let’s look at how we can use them to unit test the UI code of a real app. For each screen, I’ve highlighted two things we might want to test but require a bit of thought.

    Home Screen

    image00Let’s start with the home screen. We just have three buttons (two if there is no camera available) and in the cut down V1 feature set our actions are that we’re launching either the photo picker provided by the OS, or a ViewController just containing UIWebView with our “inspiration”.

    Verifying Button Click

    So we want to test that the right thing happens when the buttons are clicked.

    There’s three phases of testing buttons on iOS. The first is that we don’t do it. The second is that we expose the method that should be called when the button is pressed, and we test that. The third is that we programmatically tap the button.

    Option 1: testSelector

    1. We add a selector “xButtonPressed” to the x button. So in this case, “galleryButtonPressed:” to “galleryButton”.
    2. We expose that method in the header file.
    3. We write a test that is “testXButtonPressed” that verifies that selector does what it should.

    Seems reasonable, right? We will have decent coverage here. Two main problems:

    1. We have had to expose a method only for the purposes of testing. Not the worst thing, true, and Java has a @VisibleForTesting annotation because this is a common pattern. In iOS we can get around this by re-declaring it in our test in a category, but I like that even less.
    2. We haven’t verified that that action actually gets added to the button.

    Option 2: sendTouches

    1. The selector gets added in the presenter, for me this is in the [presenter viewLoaded] that gets called in [viewController viewDidLoad].
    2. We mock the HomeViewController and return a real UIButton when asked for the button we want to test.
    3. We call [button sendActionsForControlEvents:UIControlEventTouchUpInside];
    4. We verify that what happens is what should when that button is pressed (e.g. the ImagePicker is launched).

    Downside? Little bit more complicated.

    Upside? Nothing is exposed, and we are verifying that when that button is tapped, the right thing happens.

    Verifying VC Pushed On The Stack

    The other thing we might want to verify here is that another ViewController gets pushed onto the stack. In the ViewController we do this by accessing the NavigationController property, in the UIViewController base class that all ViewControllers extend.

    But if we consider pushing ViewControllers to be View code, and so it should live in the ViewController, how might we do that?

    Partial Mocks

    Partial mocks allow us to mock only part of an object. It’s great in cases like this, where we can use it to mock functions of the parent class (which we assume Apple has tested for us), and isolate our own code.

    Mocking the Navigation Controller

    So let’s say viewController_ is the instance of the thing we are testing, and we want to make sure that [navigationController dismissViewController:…] is called. That would look like this.

    // Create the mock navigation controller.
    id mockNavigationController =
       OCMStrictClassMock([UINavigationController class]);
    
    
    // Create a partial mock for the ViewController.
    id mockViewController =
       [OCMockObject partialMockForObject:viewController_];
    
    
    // Stub to return mockNavigationController.
    [[[mockViewController expect]
       andReturn:mockNavigationController] navigationController];
    
    
    // Set up expectations.
    OCMExpect([mockNavigationController
        dismissViewControllerAnimated:YES
                           completion:nil]);
    
    
    // Call the method that should trigger them.
    [viewController_ dismissViewControllerAnimated:YES
                              withCompletionBlock:nil];
    
    
    // Verify!
    OCMVerifyAll(mockNavigationController);
    OCMVerifyAll(mockViewController);
    

    Image Editing Screen

    Next up is our image editing screen. Here you can see that we have buttons on our navigation bar – a gallery button here, and also if there is a camera on the device a camera button.

    Notice with the camera button, this is something that we can’t use UIAutomation for because the simulator doesn’t have a camera, but we can totally unit test.

    Again we have three buttons at the bottom, but the Apply button here is a little more complicated than last time, and we’ll get to that.

    Navigation Bar Buttons

    We can take a similar approach to navigation bar buttons as we did to regular buttons. But there are a couple of differences.

    Firstly, these get set in viewDidLoad, but we can separate them out by creating them in the Presenter. The top level Presenter class has properties leftNavigationButtons: and rightNagivationButtons:, so in my top level ViewController class viewDidLoad: looks as follows.

    - (void)viewDidLoad {
     [super viewDidLoad];
    
    
     [[self navigationItem] setLeftBarButtonItems:[[self presenter] leftNavigationButtons]
                                         animated:YES];
     [[self navigationItem] setRightBarButtonItems:[[self presenter] rightNavigationButtons]
                                          animated:YES];
     [[self presenter] viewLoaded];
    }

    I create these buttons in the presenter because I want the target of the buttons to be in the presenter, but it doesn’t really matter – the point is that it is isolated.

    Now we want to test that when the button is tapped it does what we want it to. We get it out of the array returned, and then we call “performSelector” on it.

    // Extract the button.
    UIBarButtonItem *button = (UIBarButtonItem *)
       [[presenter_ leftNavigationButtons] firstObject];
    // Perform the action.
    [[button target] performSelector:[button action]
                         withObject:button];

    Handling Asynchronous Code

    The other testing challenge we have on this screen is the apply button. Why? Because to make the app feel faster the image gets pre-processed, and the apply button is only enabled when that pre-processing is done. The challenge arises because that pre-processing happens on the background thread.

    • In the UI thread, load the view.
    • Switch to background thread.
    • In the background thread, process the image.
    • Switch back to the UI thread.
    • In the UI thread, enable the apply button.

    This makes things easier because we don’t have to deal with handling the apply button being pressed before it is ready, but it does make our testing slightly harder.

    XCTest has a mechanism for testing asynchronous code, it’s called the Expectation. It’s a little confusing to read about, but essentially:

    1. Create a thing (an “Expectation”).
    2. Include a timeout in your test that will allow it time to happen.
    3. Call “fulfil” on that expectation when your thing has happened.

    So here we create an expectation:

    XCTestExpectation *expectation =

        [self expectationWithDescription:@"desc"];

    And then we give it a wait (typically I put this before my asserts / verify):

    [self waitForExpectationsWithTimeout:1 handler:nil];

    If we run the test now, it will fail. Because the expectation is never fulfilled. Fulfilling is so easy, we just call:

    [expectation fulfill];

    But where do we put it? In this case, we want to wait for the apply button to be enabled and fulfill it then. If we are using a mock, we can use andDo, so;

    OCMExpect([mockApplyButton_ setEnabled:YES]).andDo(^(NSInvocation *invocation){
      [expectation fulfill];
    });

    So it’s important to be clear here – the wait goes at the end of the test. Fulfilling it goes somwhere inside the test. If you use andDo, it’s at the last thing that will be called at the end.

    One of the super fun things about asynchronous testing is that if you get your test wrong, it’s often another test that will fail. This is how to make debugging extra exciting.

    Processed Image Screen

    This slideshow requires JavaScript.

    The last screen of the app. We have a carousel of two images the user can swipe between.

    Swipe Gestures

    This is actually a test I didn’t write. Don’t get me wrong – I tried. But I couldn’t figure out how to programmatically simulate a swipe gesture and opted to test this using KIF.

    I’m including this because much as I think you can unit test almost everything, it’s almost everything and not everything. Some parts of the UI are better covered by UIAutomation – and I decided this was one of them.

    Breaking into UIImage

    Now this is the last example so let’s go even deeper.

    Show and Hide is an image processing app. Which means it takes an image and does stuff to it – and that was part of the app that I really wanted to be able to develop against my tests. Firstly because it’s by far the most complicated part and I really wanted to understand what was going on. And secondly because I rewrote this part of the app several times before I could get it fast enough. My tests were invaluable here.

    Who has written tests involving images? Who did it by including test images in the resources?

    That probably works fine for a lot of things, but for me what I wanted was images with certain properties that I could say what they should be like at the end of this process. To give you a sense of that – this part of the app (about 300loc) has 22 tests and approximately 400 lines of test code, plus performance tests (which I put in a separate target because the get run 10x each and make my test target too slow).

    But that’s cool, we’re programmers right? We make things. Including UIImages. And we break things. Including UIImages.

    So in addition to my test code, I have test helper functions that:

    • Simpler but slow – draw the image into context:
      • Make an image with one color with a certain size.
      • Make an image with multiple colors. a 2×2 4 color image, and a 3×3 2 color image.
    • Harder but faster and more flexible, creating a context, filling an array with RGBA data, and calling CGBitmapContextCreateImage():
      • Make an image with a given width and height from an array of UIColors.
    • Break an image down into a list of UIColors (similar to the above).
    • Compare two UIColors and see if they are the same (if the r, g, b, and a values all match).

    This means that I can:

    • Create images with certain properties (matching the tests I want to run).
    • Compare the resulting images – beyond size. Remember we want confidence not just coverage. If two images have the same size, and break down to arrays of equal UIColors, I can consider them to be equal.
    • Create enormous images for performance tests.

    I’m not including code here because it’s quite long but it’s open sourced and on GitHub.

    What About KIF?

    KIF is great. I also have KIF tests, I see these strategies as entirely complementary.

    KIF tests:

    • Are slower to run.
    • Are hard to test corner cases on.

    KIF tests are great for:

    • Making sure your app is accessible throughout.
    • A sanity check that each view loads.
    • Testing things like carousels.

    The End

    These are some of the most interesting testing challenges that I encountered building Show and Hide and aiming for 90%+ test coverage. I’ve delved into some of them more in this workshop.

    That day when I was told we had to get our test coverage up to ship, I discovered how little I knew about testing, and how the standards in the projects I had previously worked on were just not good enough, in general, but especially compared with the way we write tests on the server side.

    It was an opportunity for me to go and start figuring out how to do these things, because as I’ve covered here, whilst sometimes it requires a bit of thought, and isn’t done often, it’s almost always possible.

    And now, I have the answer that I didn’t when I was a junior dev – when the guy said “we’re moving too fast to write unit tests”. Today what I would respond is how long do you want to move fast for?

    Yeah, it’s usually faster to ship today’s code without tests, but it’s not technical debt – it’s an unhedged call option – and some day soon it’s liable to come due.

    Testing is an investment, it does take time. If you can develop against your tests though, you can start to get it back because it is so much faster. If you can be confident shipping a build in 30 minutes rather than in 4 hours then you’ll see a difference. I haven’t mentioned performance tests here, which are worth looking into in order to monitor the performance of your app over time.

    The biggest difference are those that are hardest to quantify – the bug found early, that didn’t make it into production. But I think the biggest benefit is the structure and understanding that you get in and of your code when you default to trying to unit test everything.


    If you found this interesting, I’ve covered some of these strategies in more detail in this workshop – there’s a sample app and a guide that takes you step by step through adding tests.


  • Launching! iOS Unit Testing: Beyond the Model

    Launching! iOS Unit Testing: Beyond the Model

    I’m super excited to release something that I’ve been working on for a while.

    Unit testing on iOS is… not common. And part of the problem is that people don’t know where to start. It can be overwhelming.

    Building on my years of experience leading iOS apps with over 80% test coverage, including at Google, and my extensive experience in curriculum development and education, I’ve put together a workshop that takes you through the process step by step. It covers:

    • Writing unit tests on model classes.
    • Using mocks.
    • Unit-testing UI code (and how to test UIViewControllers!).
    • Writing your first UIAutomation tests.

    The (MIT-licensed) sample code is ready to go (just check it out from GitHub) so you can focus on writing better tests, not wrangling dependencies.

    It’s fully digital. Download the PDF, and work through. Email support included.

    Who is this for? If you have iOS experience and you:

    • Haven’t written any tests and don’t know where to start, start at Section 1.
    • Are comfortable writing unit tests but want to better test your UI code, start at Section 2.

    This isn’t designed for people without iOS experience looking to learn iOS.

    Some nice things people have said already:

    “Thanks so much… it’s helped me a lot. I have a fairly large, complex code base that I want to add tests to and the workshop has helped me to think about how to even begin to do that.”

    —Cathy @catshive

    “I really like the workshop. I like the format and pacing, how you’ve structured the Xcode project and using unfulfilled/failing tests for the participant to add themselves. I’ll definitely check out KIF for my own projects, even if it’s just as a way to ensure my apps are properly Accessible.”

    Harry @inquisitivesoft

    Buy it for 20 USD

    Please note: this focuses on Obj-C not Swift, although the patterns should be applicable to Swift as well. I’m looking into a Swift version so let me know if that’s something you are interested in.

    If you’re a student or underemployed, contact me and I’ll send you a discount code.

    Thanks so much to the many people who tested, reviewed, and gave feedback.